Blackmagic probe

TL;DR: Flash new software to a cheap STLink v2 clone to get an integrated gdb

Essentially, I just followed the the instructions in their wiki. I still had some problems guessing the pinout and documented my progress.

Hardware:

To program the controller with new software you need a second programmer. I used another STLink clone to flash the new software. GND and VDD is easy, as it is led out on the programming header. Just connect this to the target.

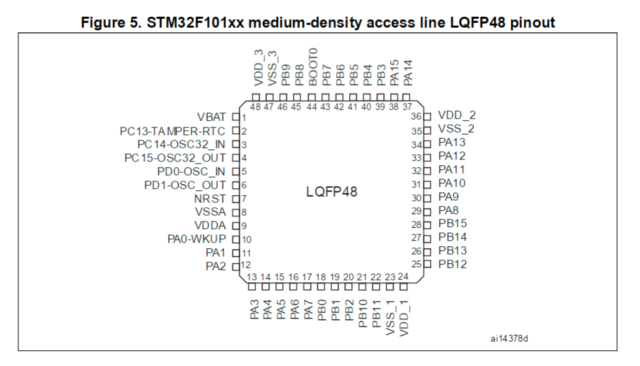
For SWDIO and SWCLK you have to look at the datasheet. Which says, that PA14 is SWCLK and PA13 is SWDIO. Head over to the used package and locate those pins:

Screenshot_20161203_140156.png

source: STM32F101x8 Datasheet Rev 17 DocID13586 from st.com

PA14 is the rightmost pin in the top line. This means our pinout from top to bottom is

GND – SWCLK – SWDIO – 5V


Continue reading

Posted in electronics, embedded, stm32 | Leave a comment

ESP8266 + Arduino + Eclipse

TL;DR: PlatformIO offers a complete toolchain, libraries, makefile and IDE integration

Making a new microcontroller work is hard. You need to get a feel for the surrounding community and the way the manufacturer imagined them to work. PlatformIO solves all those problems and more.
What you get is:

  • the toolchain
  • package management for libraries
  • makefile
  • integration into your IDE of choice
  • tools necessary for upload
  • over-the-air (OTA) update if possible
  • support of frameworks like Arduino and mbed

You can use pip (Python Package Manager) for a fast platform-independent install. Yes, that means you can flash your ESP8266 from your smartphone or your Mac. Continue reading

Posted in embedded, esp8266, Uncategorized | Leave a comment

The problem with cheap powerbanks

TL;DR: Cheap powerbanks are overrated

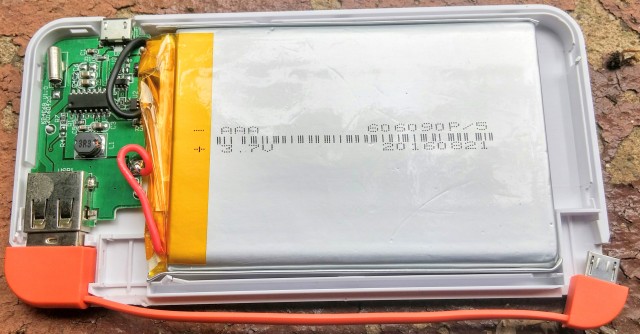
I’ve bought a few powerbanks like this one:
_20160918_125045(1).JPG

These are the common problems:
1. Outdated and underrated SMPS
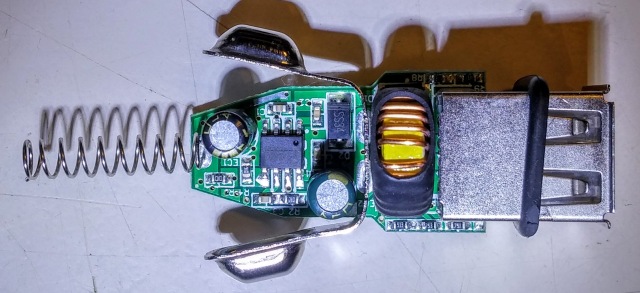
These power banks have to convert the battery’s voltage from 3.0V – 4.2V to the USB’s 5V. You can see the inductor with propably 3.3uH at the bottom left just above the USB-port.
This is physically not large enough for 2A * 5V = 10W.

Additionally, you can deduce from the winding that it has a large stray capacitance which forbids high frequencies. And a low frequency is common for old, low efficiency converters.
You could fix this with a chip inductor and an up to date converter IC in the MHz range – which costs money and some expertise.

2. Grossly overrated Lithium Battery
Chinese vendors “overrate” their batteries. The factor 3 is common.

Worse, those batteries deteriorate quickly. I’m not expecting more than 50 charge/discharge cycles from this one. The failure mode is an increased internal resistance which expresses itself in unreliable operation when the power draw is at maximum.


Not every manufacturer does this. F.e. my xiaomi powerbank truly has the rated capacity, charges with a high current at high efficiency, and additionally can be charged and discharged simultaneously.

Posted in Uncategorized | Leave a comment

Enabling zram

TL;DR:

modprobe zram num_devices=$(nproc) && \
sleep 1; \
for i in $(eval echo zram{0..$(( $(nproc) -1))}); do \
zramctl -t 1 -a lzo $i -s $(( 4096 * 1024 * 1024 / $(nproc) )); \
mkswap /dev/$i; \
swapon /dev/$i -p 1; \
done && \
sysctl vm.swappiness=100 && \
echo 0 > /proc/sys/vm/page-cluster

Oneliner to enable zram on embedded systems. This uses nproc to initialize one swap file per cpu.
‘4096’MB is the used size.
The eval is used to enable dynamic bash ranges. Lzo compresses typically 4:1.
I use the same size as my physical memory.

Posted in embedded, linux | Leave a comment

Verifying sdcards

TL;DR: Verify sdcards on the fly

DEV=/dev/sdX && \
dd if=/dev/urandom bs=4096 count=$(( $(sudo blockdev --getsz $DEV) / 8)) \
| pv | sudo tee $DEV | md5sum ; \
sudo dd if=$DEV bs=4096 count=$(( $(sudo blockdev --getsz $DEV) / 8 )) \
| pv | md5sum

I have a few sdcards which are probably counterfeit or plain broken. So I’ve developed a one liner to check the sdcard. The good part is that no temporary files are created. All data on the device is deleted.

This line reads out the fast pseudo random number generator. This data is written to the sdcard and also piped via ‘tee’ to md5sum.

In the second step, the data is re-read from the sdcard and piped into md5sum. ‘pv’ is used as progress indicator. You can leave it out. Here is an example output for a 32GB card:

7745280+0 records in6MiB/s] [ ]
7745280+0 records out
31724666880 bytes (32 GB, 30 GiB) copied, 3269.12 s, 9.7 MB/s
29.5GiB 0:54:29 [9.25MiB/s] [ ]
455fd3232c655fd8c2224116af3b2bc1 -
7745280+0 records in9MiB/s] [ ]
7745280+0 records out
31724666880 bytes (32 GB, 30 GiB) copied, 1731.66 s, 18.3 MB/s
29.5GiB 0:28:52 [17.5MiB/s] [ ]
455fd3232c655fd8c2224116af3b2bc1 -

The md5sums 455fd3232c655fd8c2224116af3b2bc1 match. ‘dd’ even shows the read and write data transfer rate.

Posted in linux | Tagged , | Leave a comment

Dual USB car charger update

TL;DR: Chinese USB adapters work out of the box


I’ve bought a new car charger because the old one was too big. The new one is made from aluminum to dissipate the heat better and doesn’t waste that much space.

It’s 2.26 USD including shipping on aliexpress. I’ve expected the electronics to be garbage as the one before but i was pleasantly surprised:

IMG_20160306_142322IMG_20160306_142340

A double sided PCB with plenty of vias and a good layout. I’ve checked the switching node with my oscilloscope (no screenshot) and everything is rock solid and no ringing. I couldn’t have done it better myself.

The components are good as well: Continue reading

Posted in electronics | Leave a comment

3.8+ kernel for Pogoplug

TL;DR attach dtb file to kernel and boot

I’m running gentoo on a Pogplug E02 and had some difficulties with kernels after 3.7. These kernels use a new infrastructure called device trees to tailor the kernel to new hardware.

Luckily this abstraction layer is already prepared for common devices. It just has to be loaded together with the kernel and initrd. Unfortunately, my u-boot doesn’t have support for device trees.

It can be fixed by attaching the device tree to the kernel. The kernel needs these options enabled:


CONFIG_ARM_APPENDED_DTB=y
CONFIG_ARM_ATAG_DTB_COMPAT=y

Afterwards, you can compile the kernel with the dtb file. I use


make -j4 zImage && make -j4 modules && make modules_install && make kirkwood-pogo_e02.dtb 

Just attach the dtb file to the kernel:


cat arch/arm/boot/dts/kirkwood-pogo_e02.dtb >> arch/arm/boot/zImage 

And generate an image which u-boot can understand:


mkimage -A arm -O linux -T kernel -C none -a 0x00008000 -e 0x00008000 -n Linux-4.1.6-gentoo-dts -d arch/arm/boot/zImage uImage-4.1.6-gentoo-dts

Posted in linux | Tagged , , , | Leave a comment

ZFS-root on LUKS

TL;DR ZFS as a root device on top of LUKS

I encrypt my devices. This saves hours of changing passwords in case a hard disk is lost. Additionally, I don’t have to think much about which data I save: passwords, signatures and photos.

These are my notes in case I need to set up the layout again.

I’m using two SSDs, Sabayon, cryptsetup, genkernel, grub2 and EFI.
1. Hard disk setup:
I’ve the following partition layout:

fdisk -l /dev/sd{a,b}

Disk /dev/sda: 119.2 GiB, 128035676160 bytes, 250069680 sectors
Units: sectors of 1 * 512 = 512 bytes
Sector size (logical/physical): 512 bytes / 512 bytes
I/O size (minimum/optimal): 512 bytes / 512 bytes
Disklabel type: gpt
Disk identifier: 1E98A553-FD92-45B0-AAAD-9B18F113173F

Device Start End Sectors Size Type
/dev/sda1 2048 411647 409600 200M EFI System
/dev/sda2 411648 1435647 1024000 500M Linux filesystem
/dev/sda3 1435648 250068991 248633344 118.6G Linux filesystem
Disk /dev/sdb: 119.2 GiB, 128035676160 bytes, 250069680 sectors
Units: sectors of 1 * 512 = 512 bytes
Sector size (logical/physical): 512 bytes / 512 bytes
I/O size (minimum/optimal): 512 bytes / 512 bytes
Disklabel type: gpt
Disk identifier: 1E98A553-FD92-45B0-AAAD-9B18F113173F
Device Start End Sectors Size Type
/dev/sdb1 2048 411647 409600 200M EFI System
/dev/sdb2 411648 1435647 1024000 500M Linux filesystem
/dev/sdb3 1435648 250068991 248633344 118.6G Linux filesystem

The 200MiB EFI Partition makes booting with grub easier. Especially with larger HDDs and GPT. The second disk holds a backup.

sd{a,b}2 is formatted in ext2. I use it for grub2 and kernel images. I didn’t set up MD devices.

sd{a,b}3 is a LUKS device. These are formatted using cryptsetup.

2. LUKS
Do a benchmark first and check the performance of your preferred cipher:

cryptsetup benchmark
# Tests are approximate using memory only (no storage IO).
PBKDF2-sha1 819200 iterations per second
PBKDF2-sha256 493215 iterations per second
PBKDF2-sha512 411529 iterations per second
PBKDF2-ripemd160 1048576 iterations per second
PBKDF2-whirlpool 189959 iterations per second
# Algorithm | Key | Encryption | Decryption
aes-cbc 128b 516.3 MiB/s 2238.0 MiB/s
serpent-cbc 128b 68.2 MiB/s 446.6 MiB/s
twofish-cbc 128b 142.7 MiB/s 281.5 MiB/s
aes-cbc 256b 386.6 MiB/s 1713.1 MiB/s
serpent-cbc 256b 68.2 MiB/s 433.5 MiB/s
twofish-cbc 256b 146.8 MiB/s 278.2 MiB/s
aes-xts 256b 1944.4 MiB/s 1948.6 MiB/s
serpent-xts 256b 445.5 MiB/s 432.7 MiB/s
twofish-xts 256b 275.3 MiB/s 281.4 MiB/s
aes-xts 512b 1448.5 MiB/s 1422.2 MiB/s
serpent-xts 512b 449.1 MiB/s 434.0 MiB/s
twofish-xts 512b 272.5 MiB/s 270.6 MiB/s

aesni_intel is active on my machine. So will go with aes-xts. Beware that the xts-version effectively halves your key length.
This creates a new LUKS container with SHA512 instead of the default SHA1:

cryptsetup luksFormat /dev/sdX3 -c aes-xts-plain64:sha512 -s 512

Do this for both devices:

cryptsetup luksOpen /dev/sdX3 cryptX

3. ZFS setup
Setting up ZFS is not in the scope of this article. It’s actually quite easy after you get used to the auto mounting. You can disable it at import with the “-N” parameter or by prepending some path, e.g. “-R /mnt/gentoo”.
This is my final setup using two crypt devices in stripping mode:

zpool list

NAME SIZE ALLOC FREE EXPANDSZ FRAG CAP DEDUP HEALTH ALTROOT
rpool 236G 112G 124G – 34% 47% 1.00x ONLINE –

zpool status

pool: rpool
state: ONLINE
scan: scrub repaired 0 in 0h6m with 0 errors on Sat Aug 22 21:54:00 2015
config:

NAME STATE READ WRITE CKSUM
rpool ONLINE 0 0 0
crypt1 ONLINE 0 0 0
crypt2 ONLINE 0 0 0

errors: No known data errors

zfs list

NAME USED AVAIL REFER MOUNTPOINT
rpool 112G 117G 96K none
rpool/root 112G 117G 96K none
rpool/root/home 89.8G 117G 72.2G /home
rpool/root/rootfs 21.8G 117G 14.0G /
rpool/root/tmp 1.54M 117G 112K /tmp

Sometimes /tmp isn’t mounted properly because the init scripts already created files there. This can be fixed by ordering zfs to mount over non-empty directories:

zfs set overlay=on rpool/root/tmp

4. The kernel and opening the LUKS container
This part was difficult. sys-kernel/genkernel-next-63 doesn’t work. The system just stops after unlocking the LUKS containers.
I used this line with genkernel-9999

genkernel –makeopts=”-j5″ –no-clean –no-mrproper –zfs –firmware –e2fsprogs –busybox –install –gpg –luks –linuxrc=/root/linuxrc all

Copy the system linuxrc into /root and edit it:

— /usr/share/genkernel/defaults/linuxrc 2015-08-22 22:58:25.269515564 +0200
+++ /root/linuxrc 2015-08-23 11:31:23.801869315 +0200
@@ -391,6 +391,32 @@
# Setup md device nodes if they dont exist
setup_md_device

+
+
+# source: http://linux.arantius.com/installing-gentoo-into-a-luks-encrypted-zfs-root
+# setups two crypt devices
+CRYPT_NUM=0
+luks_open() {
+ DISK=”$1″
+ PASSPHRASE=”$2″
+ cryptsetup isLuks “$DISK” || return
+ CRYPT_NUM=$(( CRYPT_NUM + 1))
+ good_msg “Opening $DISK as crypt${CRYPT_NUM} …”
+ # –allow-discards has serious security implications, see
+ # http://asalor.blogspot.de/2011/08/trim-dm-crypt-problems.html
+ echo “$PASSPHRASE” | cryptsetup luksOpen –allow-discards “$DISK” crypt$CRYPT_NUM
+ test_success “luksOpen $DISK”
+}
+echo -n “Please enter LUKS passphrase: ”
+read -s PASSPHRASE
+echo
+for D in /dev/sda3 /dev/sdb3; do
+ luks_open “$D” “$PASSPHRASE”
+done
+PASSPHRASE=”overwriteStringInMemory”
+unset CRYPT_NUM D PASSPHRASE
+
+
# Scan volumes
startVolumes

The slightly changed code is from this homepage. Thanks!

Use this line to upgrade to a new kernel:

genkernel –makeopts=”-j3″ –no-clean –no-mrproper –zfs –firmware –e2fsprogs –busybox –install –gpg –luks –linuxrc=/root/linuxrc –callback=”emerge spl zfs zfs-kmod” all

I suspecect that sometimes the initrd is not regenerated. Use “initramfs” in place of “all” as genkernel parameter.

5. GRUB2
I use this configuration:

cat /etc/default/sabayon-grub

# custom zfs command line
GRUB_CMDLINE_LINUX=”vconsole.keymap=de real_root=ZFS=rpool/root/rootfs dozfs=force “

I left out the “crypt_root=XXX” part on purpose. This way the patched code fragment opens the crypt devices and the stock startLuks function is not used.

This is what my consoleargs in /boot/grub/grub.cfg look like:

linux /kernel-genkernel-x86_64-4.1.5-gentoo root=/dev/mapper/root ro vconsole.keymap=de real_root=ZFS=rpool/root/rootfs dozfs=force noquiet acpi_osi=

6. Conclusion
I really like ZFS. It holds every promise BTRFS ever made. You can easily enable compression with

zfs set compression=on rpool

Only trim/discard is missing in the Linux version. There is a patched version. But this enables an experimental feature and could make mounting the zpool with a livecd impossible.

Making backups became much easier with ZFS. You can send the whole filesystem including metadata:

zfs snapshot -r rpool@2015-08-22
zfs send -R rpool@2015-08-22 | pv | zfs receive -F backup/zen/zfs
Posted in linux | Tagged , , | Leave a comment

Working with Lua on an ESP8266

TLDR; use luatool to upload scripts Lua is a scripting language which has been ported to the ESP8266. After flashing the latest firmware you can connect to the module using

screen /dev/ttyUSB0

You probably want to save your entered code over a restart. Nodemcu offers a whole file api which tells you how to manipulate the virtual filesystem. file api use this example to write into a file


file.open("init.lua", "w+")
file.writeline('foo bar')
file.close()

you can also continue writing to a file with


file.open("init.lua", "w+")
file.writeline('foo bar')
file.close()

to read the file use

file.open("init.lua", "r")
print(file.read('\r'))
file.close()

remove the file with

file.remove("init.lua")

luatool.py A better way is to write files locally on your computer, then upload and execute those files on the module. You can do so by installing luatool. Afterwards you write your files in one folder and change into it. Execute this code // UNTESTED

for file in *.lua; do
      luatool.py --port /dev/ttyUSB0 --src $file --dest $file --verbose;
done &&
luatool.py --port /dev/ttyUSB0 -r

This uploads your *.lua files and restarts the module to test the code. making luatool.py more tolerant to errors Uploads frequently fail because of different line endings in Linux, Windows and Mac. I changed luatool.py to accept nearly all combinations by changing the line 48 from

if line+'\r' == data:

to

if line+'\r' == data or line+'\n' == data or line+'\n'+'\r' == data or line+'\r'+'\n' == data or line == data:

Writing Code The file init.lua is executed in startup. I use init.lua as an init script where I register my different modules (i.e. files). Edit init.lua like this

dofile("main.lua")
dofile("wifi.lua")
dofile("httpserver.lua")
Posted in electronics, linux | Leave a comment

Wind Turbine: Cutting the blades

TLDR: I cut my blades using a chainsaw

wpid-img_20140823_181321.jpg

This happened a year ago. I never posted it because i “wanted to do it right and give good documentation”. But i think some pictures are better than nothing.

Theory

My goal is to cut 3 blades from the collected wood. Each blade

  •  is tapered. This means the width reduces towards the end. This saves material, weight, optimizes aerodynamics because of the higher tip speed and looks good
  • is twisted. Each blade has an ‘angle of attack’. Twisted means that this angle of attack is taken into account over the whole length. Which leads to a ‘twist’ in the blade
  • has an airfoil. An airfoil creates additional lift versus a plank dragging through the air

Unfortunately all this is science. There are people out there earning money with this knowledge. Some even pledge their whole lives for some minuscule advancement in this area.

Fortunately you don’t need exact science. To quote Huge Piggott (one of the leading figures in the DIY wind turbine movement):

“If it looks like an airfoil – it is an airfoil”

Which means that i probably won’t find the optimal solution. But something that works is feasible.

Chaining a block of wood into a wind blade means removing a lot of wood at the right places. The idea to cut away the biggest part with a chainsaw is from a german guy called Max aka Menelaos. He even placed a educational video online showing how to carve the blades: https://www.youtube.com/watch?v=aTloL-j5BSY. Important: This method only needs one cut! All other versions i found need 2 cuts with the chainsaw and are much more inaccurate.

I took my measurements from Hugh Piggott and Max. The measurements are available at  http://www.kleinwindanlagen.de/Forum/cf3/topic.php?t=3802.

I cut out a template for the chainsaw:

wind turbine blade notes

wind turbine blade notes

Carving

I have no experience using a chainsaw. I know that it can cut off an arm or leg. I know that cutting wood along the grain is even more difficult. That’s why i built a sledge to guide the chainsaw:

chainsaw with attached guides

chainsaw with attached guides

This failed horribly. The Guides add ca. 5mm in height. They block as soon as they reach the saw slit because the chainsaw blade together with the guides are ca. 10mm and the slit is ca. 5mm.

I continued cutting ‘freehand’. This means i try to keep the chainsaw blade as close to the template as possible.

Here you can see the leeward side of the template

leeward side template

leeward side template

And the windward side. You can see the chipboard template in front.

wpid-img_20140823_140914.jpg

Here you can see me in midst of cutting through the wood. I had to re-clamp the blade.

cutting

cutting

All done for three blades. This technique only needs one pass with the chainsaw.

wpid-img_20140823_162827.jpg

I removed the chainsaw traces using a power planner and belt sander

wpid-img_20140823_175205.jpg

It’s actually an airfoil! You can also see the poorly laminated wood. It split in the left quarter.

wpid-img_20140823_175151.jpg

The end result:

wpid-img_20140824_170800.jpg

Posted in Uncategorized | Leave a comment